Tuesday, December 27, 2011

week 1: november 7-13, 2011

since our block is landmarked, our permits had to be submitted to both the department of buildings (DOB) and the landmarks commission before construction could begin.  they were filed early in october and we received approval late in the month. hubby and i moved some of our belongings out of the cellar in preparation.  mike's crew arranged for a dumpster and decided they would start with demolition in the cellar.

the crew began by tearing out part of the ceiling and making some probes to help inform the HVAC work and determine where the new ducts and plumbing lines would be located.  all of the extraneous pipes and ducts (which we soon found out were numerous) would be removed as they worked.  they would also take out all of the non-structural walls and eliminate the existing storage closets.

as early as the first day, we were amazed by how much additional space there was once the walls came down.

before and after pictures of the rear part of the cellar -- doors seen on the left/right in the first/second pictures were inside the arches seen in the third picture on the right:

before and after shots of the storage area in the northwest corner of the cellar (open door in picture on left was inside the arch seen in the picture on the right):


before and after pictures of the old home gym in the very rear of the cellar:


this week, we also reviewed anastasia's first interior studies of the first floor bathroom and powder room and started evaluating various wall and floor tiles and fixtures.  by the time we're through with this, i will be an expert on toilets, faucets and plumbing roughs!  i also confirmed that the proposed space allocations for all of the kitchen appliances worked (30 or 36 inch refrigerator, etc.) by marking out the new locations and boundaries on the kitchen floor with painter's tape......in my next life, i may look into architecture.....

Sunday, December 25, 2011

getting started - august and september 2011

we spent the rest of the summer getting acquainted with our architect, anastasia, and beginning to map out our ideas for the renovation with her and mike, our contractor.

garden level:
the biggest debate to resolve (initially!) in the kitchen was how to make the best use of the space.  we were conflicted about the wood-burning stove--on the one hand, we didn't want to remove it because the idea that the original stove was still actually working was just too much to ignore.  it was a definite conversation starter, if nothing else.  on the other hand, it's located smack in the middle of the main (north) wall in the kitchen, and it was hard for us to envision how we could put new appliances around it in a way that allowed the kitchen to work efficiently.  we asked anastasia to give us options that contemplated both scenarios -- keeping it and sacrificing it.

we were pretty clear that we wanted to incorporate an island somehow to introduce additional storage and counter space. the south wall had original cabinetry which we knew we wanted to keep (along with the butler's pantry area) and we had already made plans to make the old ice boxes functional by retrofitting them with slide out shelving.  earlier in july, hubby and my dad installed shelves in the walk-in pantry so we were okay from that perspective.

deciding what to do with the
vintage stove was a big dilemma!
butler's pantry - keep!
original cabinets and walk-in pantry
(behind door with glass panels) - keep!


all the existing appliances (except the frig)
and dumbwaiter are located on the north wall
the refrigerator is alone on the wall
between the kitchen and the extension

the vision for the extension behind the kitchen was a little less defined, but i felt strongly that we had to figure out a way to open it up more so that it would feel like it was better integrated with the kitchen itself.  i thought it was the perfect location and size for a family room/den and casual entertaining area.  the current space was too chopped up -- a full bath in the southwest corner, a small office in the northwest corner, and a utility area with washer, dryer, a hot water heater and a second (full sized) refrigerator.

looking into utility area
from the bathroom
bathroom on left,
office on right
existing 1st floor bath,
in the extension 
washer/dryer out in open area 
hot water heater and second
frig located in the utility area
we worked closely with anastasia and reviewed several different options.  in the kitchen, we decided on a large island with a bar sink and to locate the refrigerator, double oven and range top on the main north wall.  the refrigerator would go in the corner where the dumbwaiter was.  knocking down that wall was the first "detail" we decided to sacrifice, but it made the most sense to us in the end.  the dumbwaiter didn't actually work and, besides being able to say, "that's the old dumbwaiter," the space wasn't being put to good use and there was no other logical location for the refrigerator.

anastasia and mike had determined that we could achieve the best of both worlds by installing a gas range-top on top of the wood-burning stove.  while the old stove would ultimately be non-functional as a result, this solution still kept the stove as the kitchen's focal point and retained some of the original aesthetics while also giving us a more realistic cooking option. firing up the coals to bake a chicken was definitely not happening with your girl!

the sink would be relocated to the west wall, which meant we would be able to look through the kitchen window into the new family room, and we would add an adjacent dishwasher (non-negotiable!).  we also wanted to widen the doorway between the kitchen and the family room if we were able to determine that the wall wasn't structural.

in the extension, we decided to upgrade the bathroom and relocate the fixtures so that it would feel less crowded than the current configuration.  we briefly debated moving the bathroom to the walk-in pantry in the southeast corner of the kitchen, but ultimately ruled it out and decided to leave well enough alone.  we agreed to knock the wall down and eliminate the office so that we'd have an open area for a breakfast table, television and additional seating.  we will add a larger window to the west wall to get more light and move the washer and dryer to a new laundry room on the fourth floor.

we also decided to overhaul the HVAC system to make things more efficient in the long run.  we would convert from oil to gas for heat and remove/relocate some of the existing ducts, primarily in the cellar (more on that later).  and since so much work would go into redoing the heating system.....we decided to add central air into the mix as well.  lastly, the water heater would be moved out of the extension and into the cellar with the other HVAC equipment.

click here to see the garden level floor plan.

parlor floor:
some previous residents had utilized the rear parlor as the master bedroom in the owner's duplex and added a full bathroom into the room's southwest corner.  the current location blocked a lot of the natural light into the room and also compromised the beautiful bay window overlooking the backyard.  we wanted to regain some of the rear parlor's beauty but still retain the convenience of having a bathroom on the parlor floor for future entertaining.

southwest corner (behind green wall)
we'll need a craftsman to replicate the column
and bench on the left side of the window 
so long, farewell.....
hey hey hey.....good-bye!

we talked to anastasia about keeping the bathroom in the current corner, but reducing its overall footprint by eliminating the tub.  we quickly decided that we much preferred tearing down the current bathroom and replacing it with a powder room in the southeast corner instead.  we would keep it as small as possible and thought the new location would make it feel less conspicuous.  this decision also meant we would have to find a wood craftsman that could rebuild one of the columns and part of the window seat that had been destroyed when the first bathroom was constructed.

click here to see the parlor floor plan.

third floor:
the master bathroom is rectangular in shape.  in the current layout, the tub takes up about half of the long (north) wall, and the sink is located between it and the toilet.  there's a large window which faces west, so the bathroom gets really nice light.

there's a big window with
a lot of light in the bathroom 
the toilet and sink are crammed
between the tub and window
tub is along the wall on
the bathroom's north side

between our bedroom and the office, there is a small kitchen in the pass-through with a gas stove, refrigerator, sink and cabinets.  this was installed when the house was split up as a multi-family but is less necessary for our purposes.  some of the original storage space was lost when the vanity area was replaced with the kitchen, so that was something to consider as we evaluated renovation options for this area.

the frig is in the corner; you can see
the sink and cabinets reflected in the mirror
looking into the kitchen from the
office; stove and sink are on the right
just like the first floor bathroom, we thought relocating the fixtures would make the most sense.  anastasia suggested moving the tub underneath the window would create more space, so initially we thought about building a new vanity with his and hers sinks.  after some more brainstorming, she proposed having a wet zone with a standalone tub and separate shower/floor drain.  the larger wet zone meant going back to one sink.....but that was an easy trade for me to make to achieve my ideal "spa" bathroom!

we also wanted to eliminate the large appliances but still have the convenience of a mini pantry on the third floor.....without feeling like there was a "kitchen in our bedroom."  we decided to go with a sink, mini refrigerator and 2-burner range-top and planned to conceal everything behind a wood "appliance garage" roll down door so that it would like a built-in wardrobe when not in use.

click here to see the 3rd floor floor plan.

fourth floor:
on the fourth floor, we had to decide where to locate the new laundry room.  my first choice was to use the small office off of the hallway since it was the ideal size.  then, we could remove the appliances from the fourth floor kitchen and potentially use that space as another guest room or playroom sometime down the line.  however, we would also have to establish new plumbing connections to make the office work as a laundry room.  the other suggestion anastasia made was to put the laundry in the current bathroom, convert the kitchen to a full bath with tub, and enlarge the office so that it could be used as a tv room or playroom on that floor.  this would require more work to relocate the bathroom and meant we'd end up with a smaller laundry room.  in the end, we decided to go with the original plan and convert the office to the new laundry.  a lot of the new HVAC work would be routed through the laundry too.

click here to see the 4th floor floor plan.

cellar:
the ultimate goal is to finish the basement and turn it into a secondary entertainment and storage area -- the glorified man cave, home gym, etc.  anastasia gave us a first pass at a potential layout with a lounge/dj space in the small room in the western corner, a home gym on the west side, and an entertainment area on the east side with a mounted projector screen and elevated platform seating.  we decided to leave the cellar to tackle last in terms of making final decisions -- that gives the contractor the flexibility to use that area as a staging ground for equipment and materials required for the other renovation work.  the oil tank will come out and free up some space but be replaced by a new water heater and other equipment related to the HVAC work.  a lot of the existing ducts and plumbing pipes currently hang low from the ceiling, so wherever possible, the new ducts will be re-routed and placed higher in the ceiling between the floor beams which will make the room feel taller.   most likely, they'll start by knocking down all of the non-structural walls and strip the paint from the brick archways.  we think they will be able to create a smaller mechanical closet and add in some storage space before it's all said and done.

Friday, December 9, 2011

hidden treasure

when we first saw this house, we knew there was a series of changes we'd have to undergo to help it function again as a home for 1 family.  it's legally registered as a 3-family house, so for the non new-yorkers, that means the building has been divided into 3 apartments.  the last owner lived on the garden and parlor level floors (and had access to the cellar), and there were tenants in the individual apartments on the third and fourth floors.  each had its own kitchen and separate entrances, most of which will be removed as part of our renovation.

the good news is that the most extensive boundary that separated the owner's duplex from the upper apartments was carefully constructed a number of years ago.  a partition wall and door were put on the parlor floor along the staircase to create privacy between the parlor floor and upper levels.  it was integrated fairly well and almost gave the feel of a single family home.  nonetheless, we decided after moving in that the first thing to knock down would be this privacy wall.  we were hopeful that the demolition would uncover the rest of the wooden staircase and that it would be well preserved!

so over a couple of hot days and nights in july, hubby and my dad decided to take on this task by themselves, armed with an assortment of power tools, handheld precision instruments and intuition about how to reverse engineer the handiwork.  in hindsight, i can't believe how quickly they were able to get through the various layers.  the pictures that follow show the different demolition stages (click on any to enlarge the image).

before the demo:
the first picture details a close up of the plywood inside the stairway arch that was part of the partition wall.  if you look towards the middle of the second picture past the wood paneling on the left wall, you can see the outline of the door frame that was another entry point into the owner's duplex.  in the third picture, on the other side of the arch, you can see the back of that same entry door and the wall on the other side of the stairway.

the demo!
over 2 1/2 days, hubby and my dad went to work!

the first cut!
bye bye wall!
cutting through the drywall
making progress...

the first sight of wood!
it's still there!
stained glass at top of the arch
removing the door frame
looking through arch into middle parlor
open again!
the finished product!

we can't believe how much taking the wall down has changed the look and feel of the parlor!  i'm so thankful that someone took the time to erect the wall as carefully as they did so many years ago.  the original beauty and craftsmanship were well protected and will only require some relatively minor touch-up work to repair the areas that were damaged.

Saturday, December 3, 2011

first things first -- a point of reference

so....this first post is long overdue in many ways, but it probably makes sense to start off by describing our limestone and its current state before i start posting updates and pictures about the changes we're in the process of making to it!

our house is a 4-story limestone that was built in 1899.  it's about 19 ft. wide and 43 ft. deep, with what we believe to be an original extension on the garden and parlor floors (haven't had time to pull the historical plans from the DOB yet).  it's currently set up as a 3 family, with an owner's duplex and separate apartments on the 3rd and 4th floors.  we learned from the previous owners that it had only changed hands a few times over the last century, so a lot of the original detail was still intact and in pretty good condition throughout most of the house!  our goals are to reconfigure it for 1 family, modernize where necessary, and yet retain its integrity wherever possible.

our renovation process started almost immediately after we moved in.  we have a fabulous general contractor, mike zych, who renovated our first brownstone (http://www.zychny.com/). he put us in touch with a great architect, anastasia amelchakova, who is working overtime to help us realize the vision we have in mind for our new home (http://www.studioppark.com/)!

garden level:
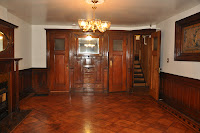
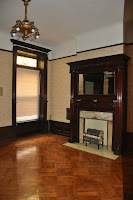
the dining room is on the front of our limestone, with an interior stained glass window, built-in cabinetry, a fireplace, wainscoting, closet and bay window.  for now, we don't have to do anything to it, but eventually we will repair a hole in the stained glass, replace the chandelier and possibly augment the plaster work in the ceiling.

dining room
dining room
dining room

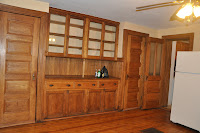
from the dining room, you walk through a narrow butler's pantry into the kitchen, which has original cabinetry, most of the bead board, a walk-in pantry and a non-functional icebox and dumbwaiter.  the original wood-burning stove built in 1896 is still there and was a showstopper for us the first time we saw it!  while beautiful and unique, it takes up a lot of space and poses some challenges for a modern family since the appliances are situated awkwardly around it.  our renovation will include updating and relocating the appliances, removing the dumbwaiter wall, installing an island and opening up the doorway between it and the extension.

butler's pantry; walk-in pantry is on the other side
view from butler's pantry into kitchen
iceboxes are behind the
2 small doors on the right
original wood cabinetry; open door to
left of refrigerator leads to extension
old dumbwaiter is inside
the door on the right

currently, there is a full bathroom, a separate office, a utility area with a washer and dryer and access to the backyard crammed into the garden floor extension.  there's also a separate boiler that provides hot water everywhere and heat to the extension on the garden and parlor floors.  we plan to upgrade the bathroom, knock down the wall that separates the office from the utility area, and add a second window to the rear wall, resulting in what we hope will be a casual, open family room off of the kitchen with a lot more light.  we will also relocate the washer and dryer to a new laundry room on the fourth floor and remove the boiler as part of an overall HVAC overhaul.

bathroom on left,
office on right
extra boiler,
backyard access
window on right
looks into kitchen

parlor floor:
the parlor floor has a grand vestibule/entryway, high cove ceilings throughout and 4 distinct areas.  there's a bay window and pier mirror in the front parlor and a fireplace, wainscoting and stained glass in the smaller, middle parlor.  hubby and my dad actually completed the first major renovation on their own a few weeks after we moved in.  they (carefully!) knocked down the privacy wall that had been meticulously erected years ago between the middle parlor and the staircase to separate the owner's duplex from the two upstairs apartments.  in doing so, they opened up that area tremendously and uncovered very elaborate woodwork in the stairwell that had been remarkably preserved over who knows how many decades!?!


front parlor

         
front parlor

front parlor, looking into
middle parlor

looking into middle parlor;
privacy wall on right behind arch
middle parlor
fireplace
middle parlor, looking into
the library and rear parlor

pocket doors separate the middle parlor from the next room that we've decided to call the library because of the original built-in shelving located between two closets.  this room has a fireplace and another set of pocket doors that lead to the rear parlor in the extension.  here, there is wainscoting around the room, a skylight with stained glass, a fireplace and a bay window/window seat.  previous owners used this area as the master bedroom of the duplex apartment so at some point, a large full bathroom was added to the back of this room.  our renovation will remove the full bath and replace with a much smaller powder room in the opposite corner.  we will also attempt to restore the window seat and column on the left that were destroyed when the full bath was constructed and try to make the fireplaces in the library and rear parlor functional again.

rear parlor, full bath is behind
green wall on left side
library built-in shelves between 2 closets
library fireplace

rear parlor bay window
rear parlor fireplace
rear parlor, looking into library

third floor:
we claimed the third floor as the master suite!  the front room is our master bedroom, and it has a bay window/window seat, fireplace and walk-in closet.  the rear bedroom also has a fireplace and walk-in closet and will function as our office/den (and possibly pull double duty as a nursery for a while once we start our family).  cove ceilings are found throughout this floor too.

master bedroom
master bedroom

master bedroom


office/den in master suite

office/den in master suite


office/den in master suite


one of the original vanity areas is still intact (with mirrors, built-in cabinetry and a pocket door) and is located in the pass-through between the master bedroom and our office.  when this floor was converted to a separate apartment, the other vanity area was removed and replaced with a tiny kitchen that has a full sized refrigerator, a small oven and a few cabinets. the master bath and two hall closets are in the back of the third floor.

vanity in pass-through
      kitchen on vanity's other side
hall closets
master bathroom
master bathroom
master bathroom

our renovation on this floor includes upgrading the master bath and reworking the kitchen into a smaller, less conspicuous pantry and storage area.  some of the new HVAC work will be hidden in the closets and we are considering enlarging them a bit as well.

fourth floor:
there are two bedrooms on the fourth floor that we will use as guest rooms for now and as kids' rooms in the future.  both have fireplaces and there is another bay window/window seat in the front bedroom.  a pocket door separates the two vanity areas between the front and rear bedrooms.  there is a half bedroom on the front of the house and a small bathroom with a shower across from the rear bedroom.  the half bedroom on the back of this floor was converted into a kitchen when this floor was turned into a separate apartment.  there's also a room off of the hallway that was previously used as a small office.
rear bedroom, 4th floor

front bedroom, 4th floor
rear bedroom, 4th floor
vanities and pass-through
half bedroom, 4th floor
4th floor bathroom
4th floor bathroom
kitchen
small office/room
our renovation will include putting a new laundry room and some of the new HVAC work into the current office area.  at some point, we will also update the bathroom and may consider enlarging it by moving it to the current kitchen.  it's still TBD (i think!) whether or not we will remove the kitchen appliances that are there now.

cellar:
the unfinished cellar runs the entire length of the house, including the rear extension.  there is a separate room in the back of the cellar/extension.  the mechanical room which houses the furnace is in the middle of the cellar, and the oil tank and gas/electrical meters are in the front.  there are several storage closets and partition walls were put up in a couple of places, creating separate areas throughout.

back of cellar, storage closet on left
front cellar storage closet
front of cellar, oil tank, meters, etc.


the guts of the new HVAC system will be in the cellar.  our renovation includes converting to gas heat, installing central air conditioning, and creating zones so we can separately control both on each floor.  we will also finish the basement so it can be utilized as an additional entertainment area and plan to remove all of the nonstructural walls to open it up as much as possible.

now that the starting point has been detailed......i'll be playing catch up over the next few posts to describe the work that is already underway.  going forward, i will do my best to keep this blog up to date!!!

stay tuned!